
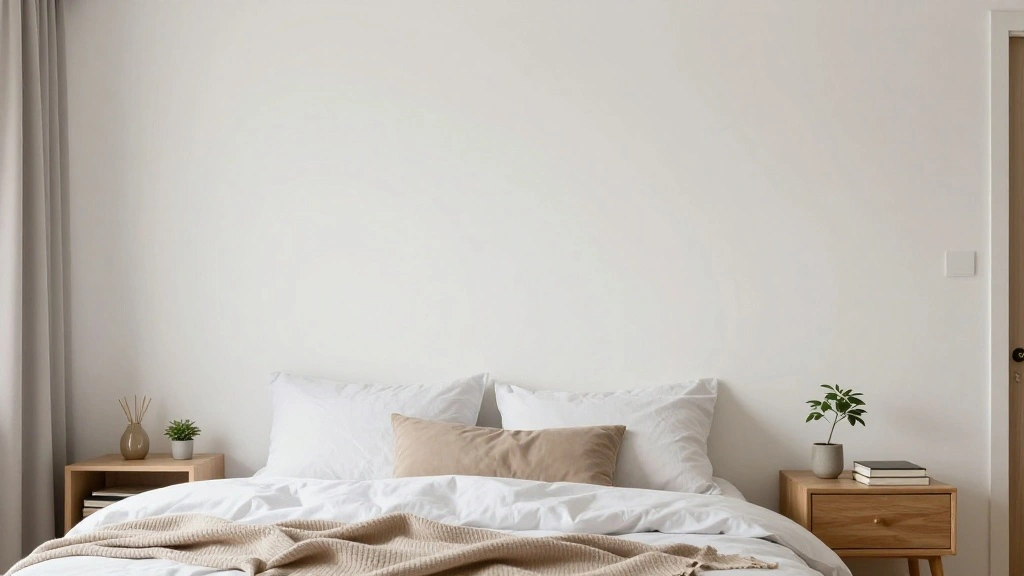
Are you tired of blank walls in your bedroom? A bare wall can make a room feel lifeless and uninviting. Adding a personalized touch can dramatically enhance your bedroom’s atmosphere. Making a DIY wall hanging is a fun and creative solution that not only beautifies your space but reflects your personality.
In this guide, you will learn how to create a stunning wall hanging using simple materials and easy techniques. You will be able to choose colors and designs that resonate with you, transforming your bedroom into a warm and inviting sanctuary. By the end of this project, you will have a unique piece of art that you made yourself!
This project is designed for beginners and will take approximately 2-3 hours to complete, making it perfect for a weekend craft. Let’s dive into this creative journey and give your bedroom the makeover it deserves!
TL;DR Summary
- Make a personalized wall hanging to enhance your bedroom décor.
- Gather simple materials like fabric, wood, and a dowel rod.
- Follow 7 easy steps to create your own unique piece.
- Enjoy a fun DIY project that takes 2-3 hours.
TL;DR Summary
Editor’s Choice

60″ Wide Printed Rayon Spandex Jersey Knit Fabric by The Yard – 4-Way St…

DEKOPRO Drill Set, Home Tool Set with 8V Pink Cordless Drill, Hand Tool …

Go Hang It! Pro, All-in-One Picture Hanging Kit – Picture Leveling and H…
Prerequisites/Materials Needed
- Materials:
- Fabric (1-2 yards, depending on size)
- Dowel rod (1-2 feet long)
- Yarn or string (for hanging)
- Scissors
- Hot glue gun and glue sticks
- Decorative embellishments (optional)
Prerequisites/Materials Needed
Editor’s Choice

Hot Glue Gun, 20V Pink Cordless Glue Gun with 30 PCS Full Size Glue Stic…

SVBright Abstract Woman Butterfly Fabric Wall Hanging Tapestry 59Wx51H I…
Skill Level & Time Estimate
Skill Level: beginner
Total time estimate: 2-3 hours
This includes:
- Gathering materials: 30 minutes
- Cutting and preparing fabric: 1 hour
- Assembling the wall hanging: 1 hour
Skill Level & Time Estimate
Editor’s Choice

FIVEIZERO 80/40 PCS Premium Stainless Steel Sewing Needles, 7 Sizes Larg…

Go Hang It! Pro, All-in-One Picture Hanging Kit – Picture Leveling and H…

Fabric Scissors Professional, 8″ Heavy Duty Sewing Scissor for Fabric Cu…
Step 1: Choose Your Fabric

Start by selecting the fabric for your wall hanging. The fabric’s color and texture will significantly impact the final look. Follow these sub-steps:
- Visit a local fabric store or browse online for fabric options.
- Look for materials that match your bedroom’s color scheme.
- Choose a fabric that is durable yet lightweight.
Pro Tip: Consider using patterned fabric for a more dynamic look. Why this matters: The fabric sets the tone for your entire wall hanging. Time estimate: 30 minutes.
Step 1: Choose Your Fabric
Editor’s Choice

BAZIMA DIY String Art Kit for Beginner, DIY Lavender Craft Kit,Unique Gi…
Fabric Scissors Professional, 8″ Heavy Duty Sewing Scissor for Fabric Cu…
Step 2: Cut the Fabric
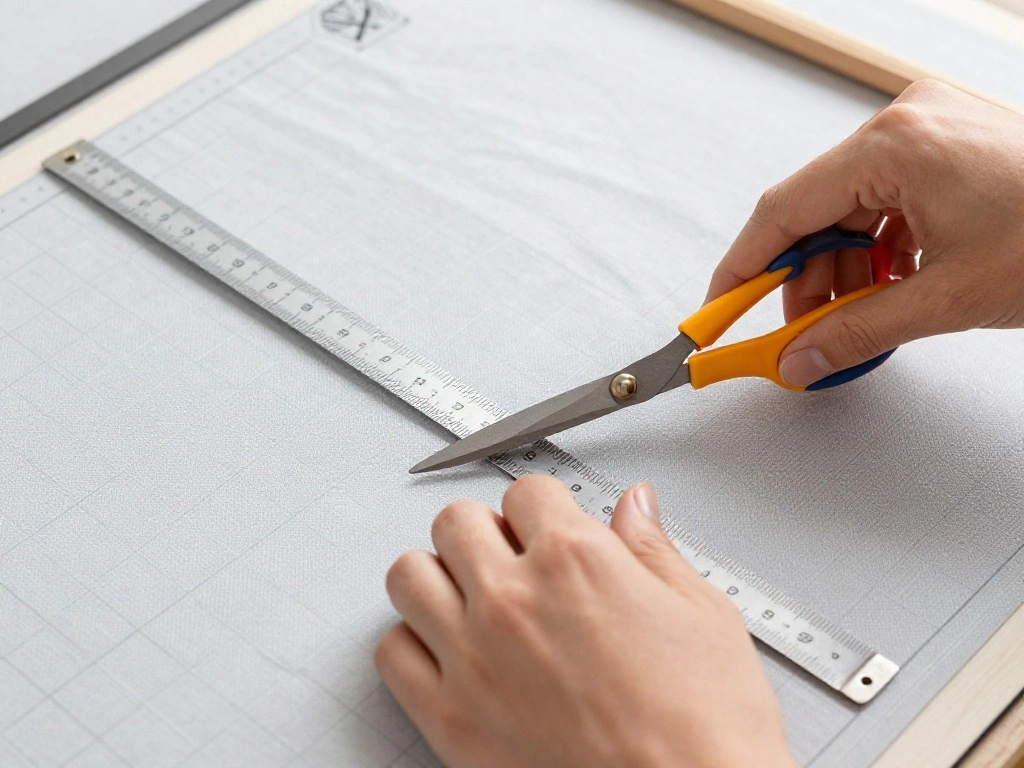
Once you’ve selected your fabric, it’s time to cut it to the desired size for your wall hanging. Follow these steps:
- Decide on the dimensions of your wall hanging.
- Measure and mark the fabric using a ruler and chalk or fabric marker.
- Cut the fabric carefully along the marked lines.
Warning: Ensure that your cuts are straight to prevent an uneven look. Why this matters: Proper cutting will help your wall hanging hang straight and look professional. Time estimate: 30 minutes.
Step 2: Cut the Fabric
Editor’s Choice

Zenacolor Liquid Chalk Markers – Dual Tips, 8 Vibrant Colors, Non-Toxic,…
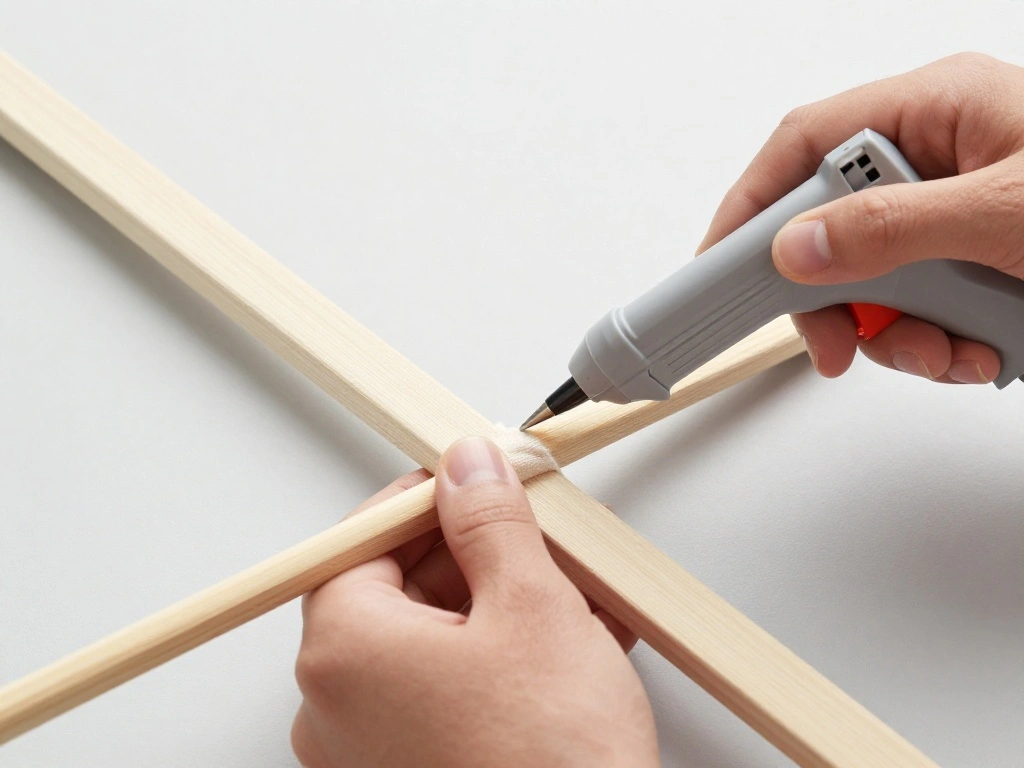
Step 3: Prepare the Dowel Rod

The dowel rod serves as the base for your wall hanging. Here’s how to prepare it:
- Choose a dowel rod that is the right length for your fabric width.
- If needed, cut the dowel rod to size using a saw.
- Sand the ends of the dowel to avoid splinters.
Pro Tip: You can paint or stain the dowel for added flair. Why this matters: A well-prepared dowel will provide a sturdy support for your fabric. Time estimate: 20 minutes.
Step 4: Attach the Fabric to the Dowel
Now it’s time to attach your fabric to the dowel rod securely. Follow these steps:
- Lay the fabric flat and place the dowel rod at the top edge.
- Fold the fabric over the rod and secure it with hot glue.
- Make sure the fabric is evenly distributed along the dowel.
Warning: Be careful when using the hot glue gun to avoid burns. Why this matters: Proper attachment ensures your fabric stays in place and looks neat. Time estimate: 30 minutes.
Step 4: Attach the Fabric to the Dowel
Editor’s Choice
Fabric Scissors Professional, 8″ Heavy Duty Sewing Scissor for Fabric Cu…

Cordless Hot Glue Gun – 20V Temp Adjust Hot Glue Gun with 43PCS Full Siz…
Exfoliating Back Scrubber with Natural Loofah and Wooden Handle, Perfect…
Step 5: Add Decorative Embellishments
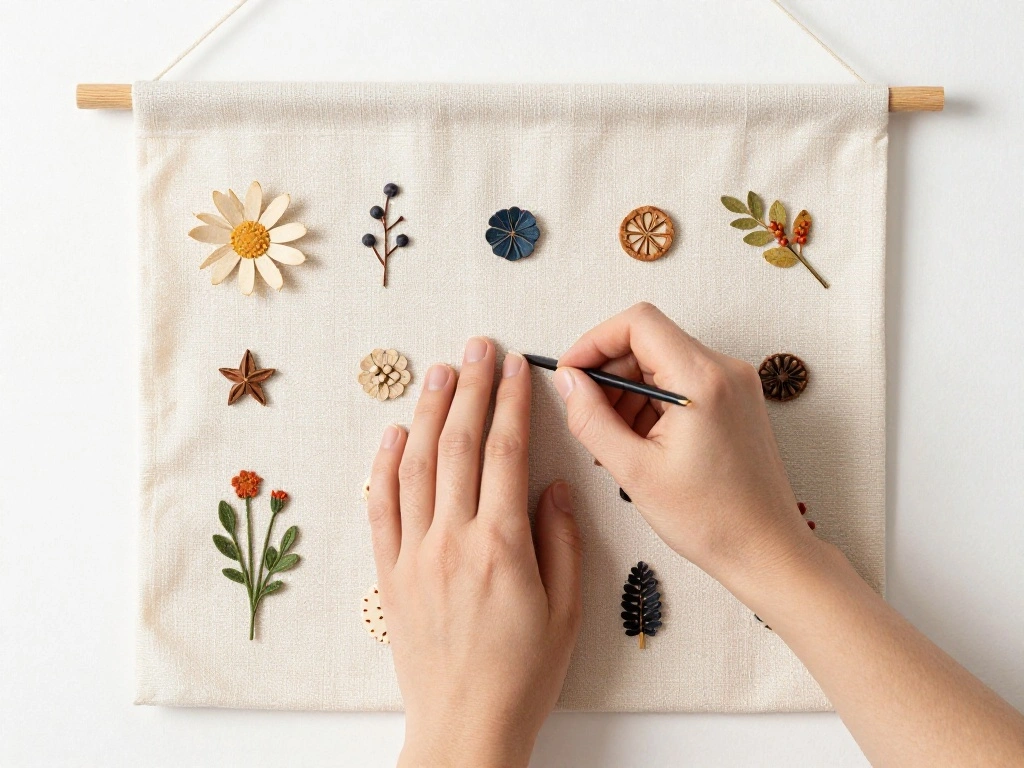
Embellishments can add a personal touch to your wall hanging. Here’s how to add them:
- Choose decorative items such as beads, tassels, or ribbons.
- Plan where you want to place these embellishments on your fabric.
- Secure them using hot glue or by sewing them in place.
Pro Tip: Consider using different textures and colors for a more dynamic appearance. Why this matters: Embellishments enhance the visual interest of your wall hanging. Time estimate: 30 minutes.
Step 5: Add Decorative Embellishments
Editor’s Choice

LIUYAXI 3/8 Inch Satin Ribbon Set – 20 Rolls Rainbow Ribbon, 5 Yards E…

12PCS Lady Silhouette Silicone Focal Beads for Beadable Pens, Keychains,…
Step 6: Create a Hanging Loop
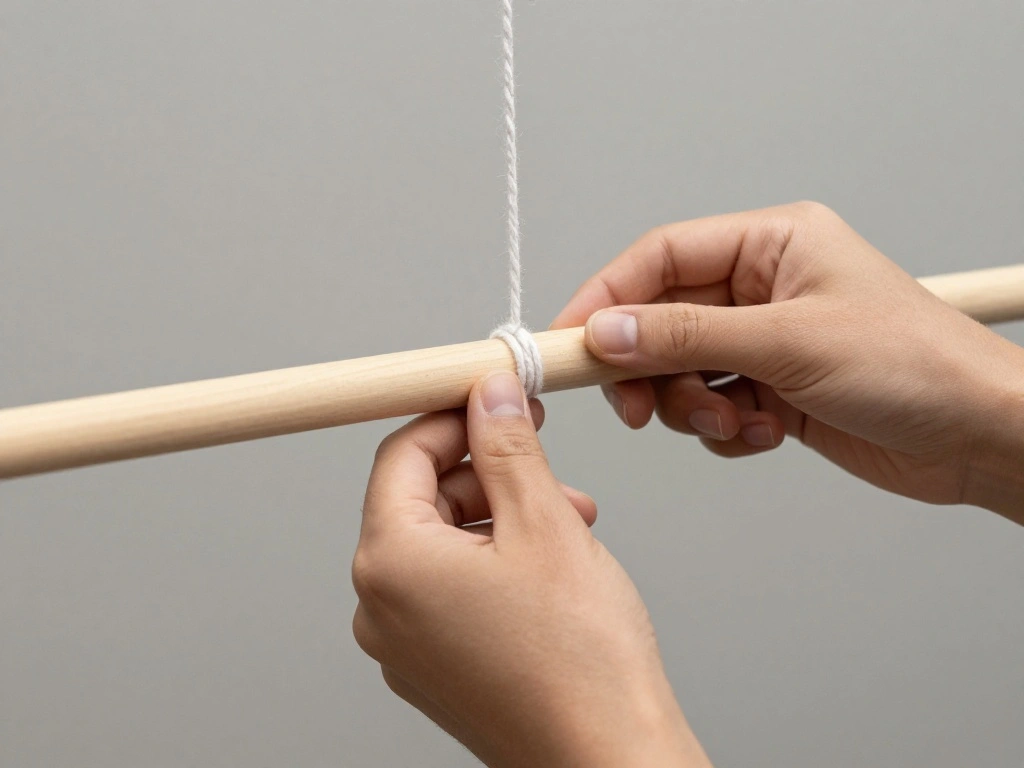
To hang your new wall art, you’ll need to create a loop at the top of the dowel. Follow these steps:
- Cut a piece of yarn or string about 12 inches long.
- Wrap it around both ends of the dowel and tie a secure knot.
- Leave enough slack to create a loop for hanging.
Pro Tip: You can use decorative yarn or string to match your fabric. Why this matters: A secure hanging loop is essential for displaying your wall hanging. Time estimate: 20 minutes.
Step 6: Create a Hanging Loop
Editor’s Choice

Wooden Dowel, 4PCS Dowel Rod Wood Sticks Round Sandalwood 12in 9in Decor…

Crochet Flower, Ombre Pink Forget Me Not, Handmade Yarn Crochet Flowers …

Titanium Non-Stick Scissors, Professional Stainless Steel Comfort Grip, …
Step 7: Hang Your Wall Hanging

Now that your wall hanging is complete, it’s time to hang it up. Here’s how:
- Choose the wall location where you want to display your artwork.
- Use a level to ensure it hangs straight.
- Use a nail or adhesive hook to secure the loop to the wall.
Warning: Ensure the hook or nail is secure to prevent your wall hanging from falling. Why this matters: Proper hanging ensures your artwork is displayed safely and attractively. Time estimate: 20 minutes.
Step 7: Hang Your Wall Hanging
Editor’s Choice

10 PCS Vintage Metal Wall Hooks, Bohemian Decorative Hook with Screws, W…

Pro Tips
- Color Coordination: Match your wall hanging with your bedroom’s color palette for a harmonious look.
- Mix Materials: Experiment with different fabrics and textures to create depth.
- Seasonal Changes: Make multiple wall hangings and swap them out for different seasons.
- Personal Touch: Incorporate personal items like photos or quotes for a unique design.
- Lighting: Consider hanging your wall hanging near a light source to enhance its visual appeal.
Pro Tips
Editor’s Choice

Sun Catcher Kits for Adults, 228pcs DIY Suncatcher Making Supplies Arts …

Vanstek Tie Dye Kit, 24 Colors Tie Dye Shirt DIY Fabric Dye for Women, K…

Sunset LED Lamp Projector, 21 Colors Changing App & Remote Control Mood …
Common Mistakes to Avoid
Warning: Cutting the fabric unevenly can lead to a lopsided wall hanging. Always measure twice before cutting.
Warning: Not securing the fabric properly on the dowel may cause it to sag. Ensure a tight bond with hot glue.
Warning: Using too much or too little embellishment can make the design cluttered or bland. Balance is key.
Common Mistakes to Avoid
Editor’s Choice

Sewing Machine Muffling Mat,Non Slip Sewing Machine Mat Reduce Vibration…
Hot Glue Gun, 20V Pink Cordless Glue Gun with 30 PCS Full Size Glue Stic…
Troubleshooting Section
Problem: The fabric is sagging.
Solution: Re-glue the fabric to the dowel, ensuring it’s pulled tight.
Problem: The wall hanging won’t stay on the wall.
Solution: Use a stronger adhesive hook or nail.
Problem: The dowel rod is too heavy.
Solution: Replace the dowel with a lighter option or reinforce the wall with a stronger hook.
Troubleshooting Section
Editor’s Choice

DaTpuik 1/4 x 12 Inch 25PCS Dowel Rods Wood Sticks Wooden Dowel Rods – U…

Fearless Tape – Double Sided for Clothing Body & Dresses (50 Strips) | C…
Variations/Alternative Methods
Consider these alternative methods:
- Macrame Wall Hanging: Use macrame techniques for a textured, boho look.
- Framed Fabric Art: Stretch fabric over a frame for a more polished appearance.
- Wooden Signs: Paint a wooden board with inspirational quotes for a rustic feel.
Variations/Alternative Methods
Editor’s Choice

Nosiny 24 Pieces Boho Macrame Keychains Bulk Mini Cute Handcrafted Tasse…

Inspirational Gift Wooden Sign, Birthday Gift for Her, Decorative Wood H…

raajsee Glittering Silver Grey Tapestry Wall Hanging Mandala-Bohemian Ro…
FAQs
What if I don’t have a glue gun? You can use fabric glue or sew the fabric instead.
How long should I let the glue dry? Allow at least 15-20 minutes for the glue to dry completely before hanging.
Is it safe to hang heavy items on the wall? Ensure your wall hanging is securely attached and use appropriate anchors for heavier items.
FAQs
Editor’s Choice

Rose Floral Sewing Kit with 130 PCS Sewing Supplies Accessory,PU Zipper …

B7000 Glue Clear for Rhinestones, 4pcs 15mL Strong Adhesive B-7000 Jewel…

KURUI 700PCs Small Nails for Hanging Pictures & 8oz Small Hammer for Wom…
Conclusion

Congratulations on completing your DIY wall hanging! You’ve not only enhanced your bedroom décor but also expressed your creativity. Now, look around your space and consider adding more personalized touches. Perhaps you can make a matching set or even dive into other DIY projects.
Explore more ideas online, and don’t hesitate to share your creations with friends and family. Remember, each project is a step towards making your home uniquely yours!