
Have you ever looked at a large, empty bedroom wall and felt a sense of disappointment? A bare wall can make a room feel cold and uninviting, robbing it of its potential charm and warmth. If you want to transform your space into a cozy haven, you’re in the right place.
This guide will walk you through the steps to style that empty wall, making it a focal point of your bedroom. You will learn how to choose the right decor, arrange it effectively, and add personal touches that reflect your style.
Throughout this process, you’ll find that styling a wall is not only easy but also a fun way to express your creativity. Whether you want to hang art, install shelves, or use other forms of decoration, this guide will give you the confidence to do it. Difficulty Level: beginner | Estimated Time: 2-3 hours
Let’s dive in and turn that empty wall into a stunning visual masterpiece!
TL;DR Summary
- Transform your large empty bedroom wall into a stylish focal point.
- Learn step-by-step how to choose and arrange decor.
- Explore tips and common mistakes to avoid for the best results.
- Feel accomplished and inspired to express your personal style.
TL;DR Summary
Editor’s Choice

upsimples 11×14 Picture Frame Set of 5, Display Pictures 8×10 with Mat o…

Zzbakress 3 Pieces Metal Flowers Wall Decor, Black Wall Decors, Flower A…

HOMECOOKIN Round Wood Mirror 24 inch Circle Mirror, Rustic Farmhouse Woo…
Prerequisites/Materials Needed
- Measuring tape
- Level
- Paint (if applicable)
- Wall art or decor items (choose 5-10 items)
- Picture hanging tools (hooks, nails, etc.)
- Floating shelves (optional)
- Wall-mounted lights (optional)
Prerequisites/Materials Needed
Editor’s Choice

CRAFTSMAN 25-Ft Tape Measure with Fraction Markings, Retractable, Self-L…

BAYKA Floating Shelves Set of 2, 22.5 inches Farmhouse Rustic Wood Wall …

KURUI 303Pcs Picture Hanging Kit, Picture Hangers Assorted Kit with Heav…
Skill Level & Time Estimate
Skill Level: beginner
Estimated Time: 2-3 hours
Step breakdown:
- Planning & measuring: 30 minutes
- Choosing decor: 1 hour
- Arranging & installing: 1-2 hours
Skill Level & Time Estimate
Editor’s Choice
Canvas Floater Frame for Finished Canvas Art, 1.25″ Deep Floating Shadow…

3D Wooden Floral Bathroom Wall Decor (Set of 4) Lightweight, Ready-to-Ha…

QsQueen Scalloped Wood Wall Shelf – 17 Inch Floating Shelf with Wood B…
Step 1: Measure Your Wall Space
Begin by accurately measuring your wall space. This step is crucial to ensure that your decor fits perfectly. Follow these sub-steps:
- Use a measuring tape to get the height and width of the wall.
- Note down the measurements for future reference.
- Mark the center of the wall lightly with a pencil.
Pro Tip: Take a photo of your measurements to remember them easily.
Why this matters: Knowing your wall dimensions will help you choose decorations that fit well and avoid overcrowding the space.
Time estimate: 30 minutes
Step 1: Measure Your Wall Space
Editor’s Choice

50 Pack Small Sawtooth Picture Hangers – Steel Picture Hanging Solutions…

VIYYIEA Vintage Gold Framed Wall Art, Sketch Birds Canvas Painting, Cute…

Digital Caliper, Sangabery 0-6 inches Caliper with Large LCD Screen, Aut…
Step 2: Choose Your Decor Style
Decide on a decor style that resonates with you. This will guide your choice of items and colors. Here’s how to do it:
- Browse online or in magazines for inspiration (look for styles like bohemian, minimalist, or eclectic).
- Create a mood board or Pinterest board to visualize your ideas.
- Consider the color scheme of your bedroom to ensure harmony.
Pro Tip: Stick to a maximum of three colors for a cohesive look.
Why this matters: A clear decor style helps streamline your choices, making the process easier and more enjoyable.
Time estimate: 1 hour
Step 2: Choose Your Decor Style
Editor’s Choice

BAYKA Wall Mounted Floating Bathroom Shelves, Wood Wall Shelf for Bathro…
Step 3: Gather Your Decor Items
Now that you have a style in mind, it’s time to gather your decor items. This process can be exciting! Follow these steps:
- Visit local home stores or browse online for wall art, shelves, or lights.
- Choose a mix of items: large art pieces, smaller frames, and decorative objects.
- Consider DIY options like painting or crafting to add personal flair.
Pro Tip: Buy a few extra items to play with arrangements later.
Why this matters: Having a variety of decor allows you to experiment with arrangements and find what looks best.
Time estimate: 1 hour
Step 3: Gather Your Decor Items
Editor’s Choice

Outdoor Lights String Patio Outside – 100ft 30M LED Waterproof Light – H…

Personalized Custom Canvas Prints: Photo On Canvas (Framed 11X14) Transf…

BAYKA Floating Shelves for Wall, Wall Mounted Rustic Wood Shelves for Ba…
Step 4: Arrange Your Decor on the Floor
Before you commit to hanging anything, arrange your decor on the floor. This helps you visualize the final look. Here’s how:
- Lay out your items on the floor in front of the wall.
- Experiment with different arrangements until you find one you love.
- Take a photo of your favorite arrangement for reference.
Pro Tip: Use painter’s tape to outline where the items will go on the wall.
Why this matters: Planning your layout on the floor prevents mistakes and saves time when hanging items.
Time estimate: 30 minutes
Step 4: Arrange Your Decor on the Floor
Editor’s Choice

4 Rolls Premium Painters Tape, Blue Tape, Masking Tape, Paint Tape for M…
Step 5: Hang Your Decor Items
Now that you have your arrangement, it’s time to hang the decor. Follow these steps for a successful installation:
- Start with the largest item first, using a level to ensure it’s straight.
- Use appropriate hanging tools for each item (hooks, nails, etc.).
- Continue adding items according to your planned layout.
Warning: Ensure each item is securely fastened to avoid accidents.
Why this matters: Properly hanging items ensures they are safe and enhances the overall look of your wall.
Time estimate: 1 hour
Step 5: Hang Your Decor Items
Editor’s Choice

Motovera Self Leveling Laser Level 100ft, Green Cross Line with Tripod, …

Command 15 Lb XL Heavyweight Wall Hook, Damage Free Hanging Wall Hook wi…
KURUI 303Pcs Picture Hanging Kit, Picture Hangers Assorted Kit with Heav…
Step 6: Add Finishing Touches
Your wall is almost complete! Now, add those finishing touches that make it uniquely yours:
- Consider adding wall-mounted lights to highlight certain pieces.
- Incorporate plants or shelves for added interest.
- Step back and evaluate the overall look; adjust items as needed.
Pro Tip: Use a variety of heights and textures to create visual interest.
Why this matters: Finishing touches complete the look and add your personal style to the space.
Time estimate: 30 minutes
Step 6: Add Finishing Touches
Editor’s Choice
BAYKA Floating Shelves for Wall, Wall Mounted Rustic Wood Shelves for Ba…
Pro Tips
- Layer Your Items: Mix frames, art, and shelves to create depth.
- Color Coordination: Use colors from your bedding or furniture to tie the room together.
- Change it Up: Don’t hesitate to rearrange your decor as your style evolves.
- Lighting Matters: Add soft lighting to enhance the ambiance of your bedroom.
- Personal Touch: Incorporate personal photographs or mementos for a unique touch.
Pro Tips
Editor’s Choice

Vintage Black Wall Sconce with Ribbed Milk Glass Shade, Matte Black Hard…

Garage Wall Shelving, 46” x 12.6” Garage Shelf Wall Mounted, Heavy Dut…

upsimples 19 Pack Picture Frames Collage Wall Decor for Mounting or Tabl…
Common Mistakes to Avoid
Warning: Hanging items too high or too low can throw off the visual balance. Measure and plan your layout carefully.
Warning: Cluttering the wall with too many items can make it feel chaotic. Stick to your planned arrangement.
Warning: Not using a level can result in crooked items. Always double-check alignment before securing anything.
Common Mistakes to Avoid
Editor’s Choice

Go Hang It! Pro, All-in-One Picture Hanging Kit – Picture Leveling and H…

FINGERINSPIRE 9Pcs Frame Shape Stencils for Painting with a Brush 5.9×5….

Art Display for Kids Artwork – 10ft Alloy Steel Wire with 48 Clips | Wil…
Troubleshooting Section
Problem: Items look unbalanced.
Solution: Step back and evaluate; adjust items based on visual weight.
Problem: Wall feels too cluttered.
Solution: Remove one or two items and simplify the design.
Problem: Items fall off the wall.
Solution: Ensure you’re using the right hanging tools and secure each piece properly.
Troubleshooting Section
Editor’s Choice

Go Hang It! Pro, All-in-One Picture Hanging Kit – Picture Leveling and H…
Variations/Alternative Methods
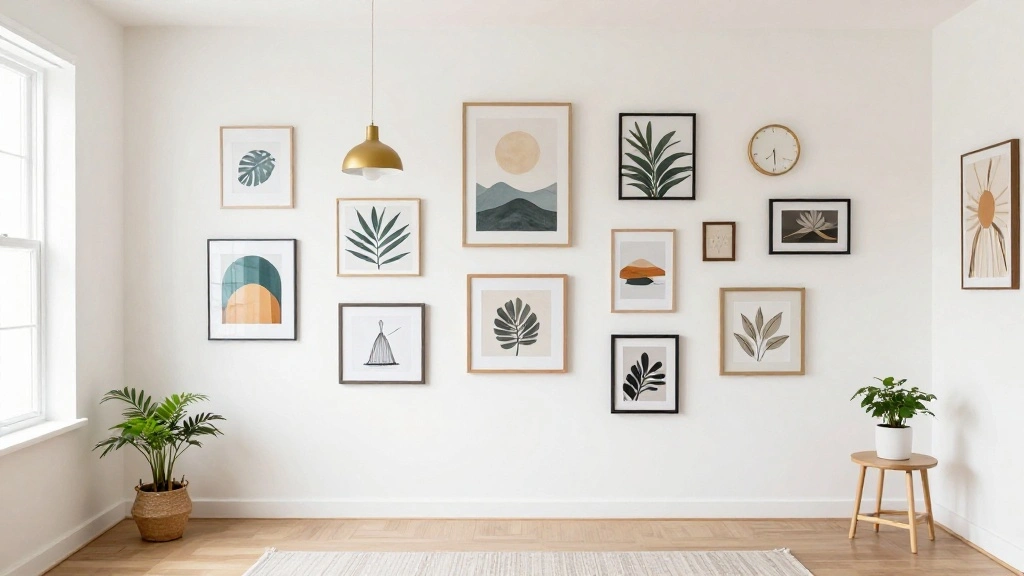
Gallery Wall: Create a collage of art pieces and photos for a dynamic look. Best for eclectic styles.
Floating Shelves: Install shelves to display decor, books, or plants. Great for functional decor.
Textile Hangings: Use fabric or woven wall hangings for added texture. Ideal for bohemian themes.
FAQs
What if I don’t have enough decor items? Start with a few key pieces and gradually add more over time.
How long should I let paint dry before hanging items? Typically, wait at least 24 hours for paint to cure properly.
Is it safe to hang heavy items? Yes, just ensure you’re using appropriate anchors and hardware for the wall type.
FAQs
Editor’s Choice

Bwodke Botanical Wall Art Plant Floral Watercolor Canvas Prints Set of 3…
QsQueen Scalloped Wood Wall Shelf – 17 Inch Floating Shelf with Wood B…
Conclusion
Congratulations on transforming your large empty bedroom wall into a stunning focal point! You’ve taken the steps to make your bedroom more inviting and personal.
Now that you have styled your wall, consider other areas of your room that may need attention, like adding a cozy chair or updating your bedding. Keep expressing your style and enjoy your beautifully decorated space!